Reflashing Firmware
Two paths are available for updating firmware on your Invictus device:
- Firmware Flasher (Recommended) — update directly from the Configurator over USB.
- ST-Link Recovery — emergency recovery for devices that can no longer be reached over USB (corrupt bootloader, bricked device).
Firmware Flasher (Recommended)
For any working device, update firmware directly from the Configurator. No external tools required.
Steps
Open the Settings tab in the Configurator. The Firmware Flasher section includes an on-screen guide that walks through the four steps:
- Press Read Device Settings so that the current settings are loaded into the Configurator.
- Press Enter Flasher Mode. The device reboots into its bootloader; the button turns green and reads Ready to flash.
- Press Flash Firmware and select the new
.binfile. Current releases ship with versioned filenames likeInvictusHOTASv2.4.2.8.bin. A progress bar tracks flash progress. - After flashing completes, a Firmware Updated popup confirms success. Close it, then Press Write Device Settings to finalize your configuration on the new firmware.
💡 Step 4 is required. New firmware ships with its default config loaded on first boot, so your board type, sim software, and grip need to be re-written after every flash. The popup reminds you of this.
Where to get firmware
Download the latest .bin from the firmware releases page.
ST-Link Recovery (Emergency Only)
If your device becomes unresponsive or cannot be updated via USB, you can recover it using an ST-Link programmer and STM32 Cube Programmer software.
🔗 Required Tools
- ST-Link Programmer
ST-Link Programmer -
Any ST-Link V2 is suitable.
-
Pogo-Pin Clamp (optional)
Pogo-Pin Clamp - Needed only if your board does not have a 4-pin header.
-
Must be 2.54 mm pitch.
-
STM32 Cube Programmer Software
STM32 Cube Programmer
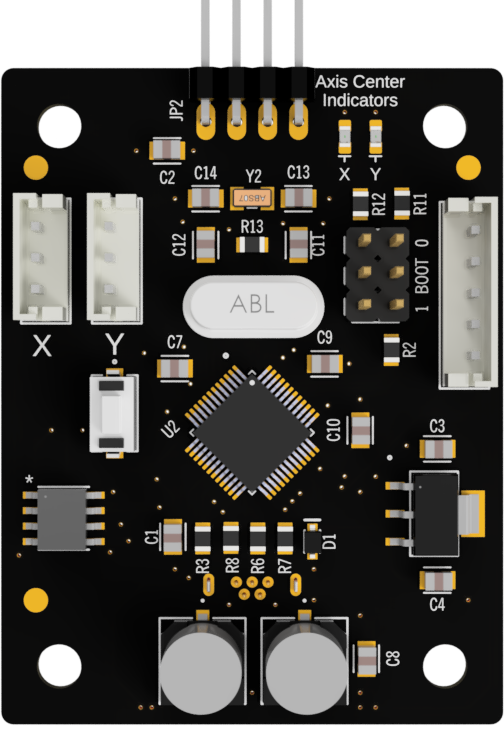
🔌 Connecting the ST-Link
- Locate the 4-pin header (or 4 through-hole pads) at the top of your control board.
From left to right: - 3.3V (Do not connect to the 5V pin on the ST-Link)
- SWDIO
- SWCLK
- GND
- Connect the ST-Link to the board using DuPont cables or a pogo-pin clamp:
- 3.3V → 3.3V
- SWDIO → SWDIO
- SWCLK → SWCLK
- GND → GND
- Plug the ST-Link into your PC via USB.
🖥️ Using STM32 Cube Programmer
- Open STM32 Cube Programmer.
- Select ST-LINK as the connection type.
- Press Connect.
- If successful, device details will be displayed.
🧹 Full Chip Erase
- In Cube Programmer, go to the Erasing & Programming tab.
- Select Full chip erase.
- Run the erase.
- This removes all existing firmware from the chip.
📂 Flashing the Bootloader
- In the same tab, click Browse and select: invictusbootloader.hex (Available in the latest firmware release)
- Ensure Verify programming is checked.
- Press Start Programming.
- The bootloader is written to the device.
⚠️ Important: Do Not Flash the Application Yet
- It is recommended to flash only the bootloader using ST-Link.
- With the bootloader installed, the device can be updated normally via the Invictus HOTAS Configurator.
Steps:
1. Disconnect the ST-Link.
2. Connect the device to your PC via USB.
3. The device will automatically enter Flasher Mode.
4. Open the Invictus HOTAS Configurator, go to the Settings tab, and use the Firmware Flasher section.
5. Choose the .bin firmware file from the latest firmware release.
This process ensures:
- The bootloader is working correctly.
- The Configurator can communicate with the device.
- Application firmware loads through the normal update process.
✅ Summary
- Use ST-Link + Cube Programmer only for recovery and flashing the bootloader.
- Always flash the application firmware (
.binfiles) through the Invictus HOTAS Configurator. - This confirms proper USB communication and ensures your device works as intended.