VR Passthrough Cockpit
Beta
The VR Passthrough cockpit is a beta release. It works end to end, and we're refining it with tester feedback; report anything odd through Report an Issue in the app sidebar.
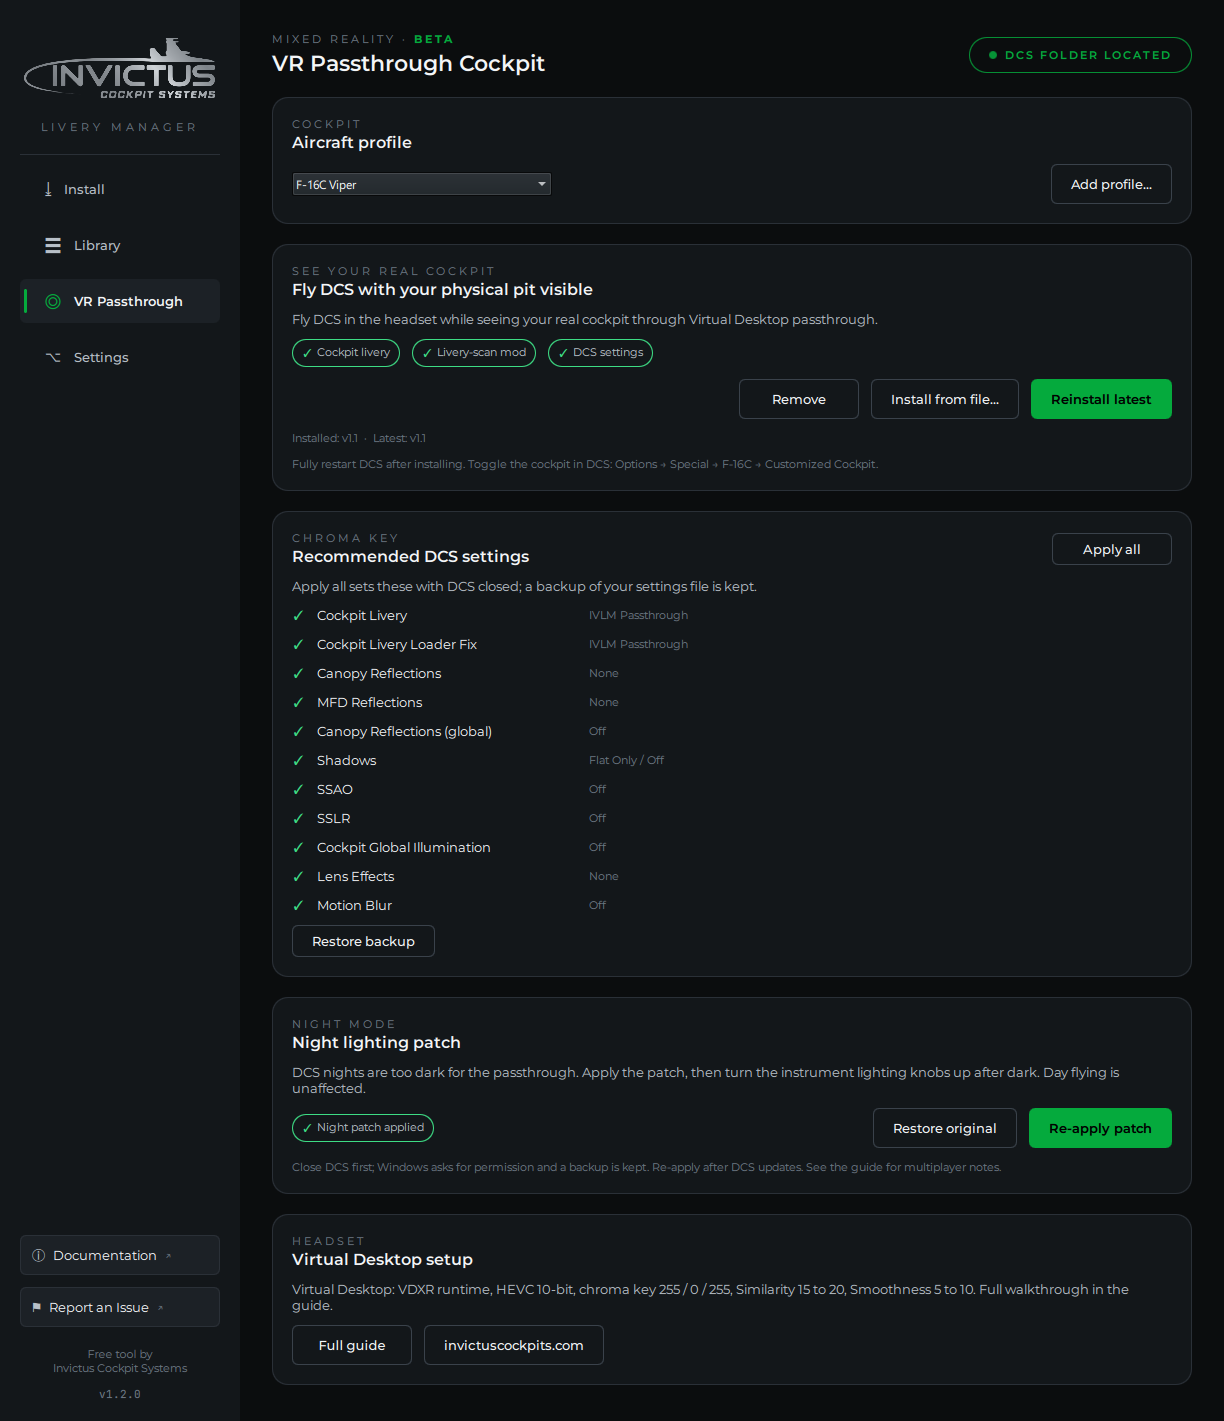
The VR Passthrough page sets up a mixed reality cockpit: you fly DCS in a headset while seeing your real, physical cockpit through passthrough. The manager installs a special cockpit livery that paints every physical surface of the virtual cockpit in a chroma-key color. Virtual Desktop then replaces that color with the camera feed, so everything below the canopy rails becomes your real pit while the HUD, canopy, outside world, and airframe stay in the headset. The passthrough boundary follows the jet's own 3D geometry as you move your head.
What you need
- A physical cockpit to sit in. The livery is built for 1:1 replica pits; every switch, gauge, and panel you see is the real one in front of you.
- A Quest 3 (or similar headset) running Virtual Desktop with passthrough chroma keying.
- The DCS F-16C or F/A-18C module. Both ship as built-in cockpit profiles; more are on the way, and you can wire in your own (see Cockpit profiles below).
Install the cockpit livery
Pick your aircraft in the profile selector, then click Install cockpit livery. The manager downloads the latest livery, installs it into your DCS Saved Games folder, and adds a small livery-scan helper mod that DCS needs before it will load cockpit liveries from Saved Games. Nothing is written into the game installation for this step.
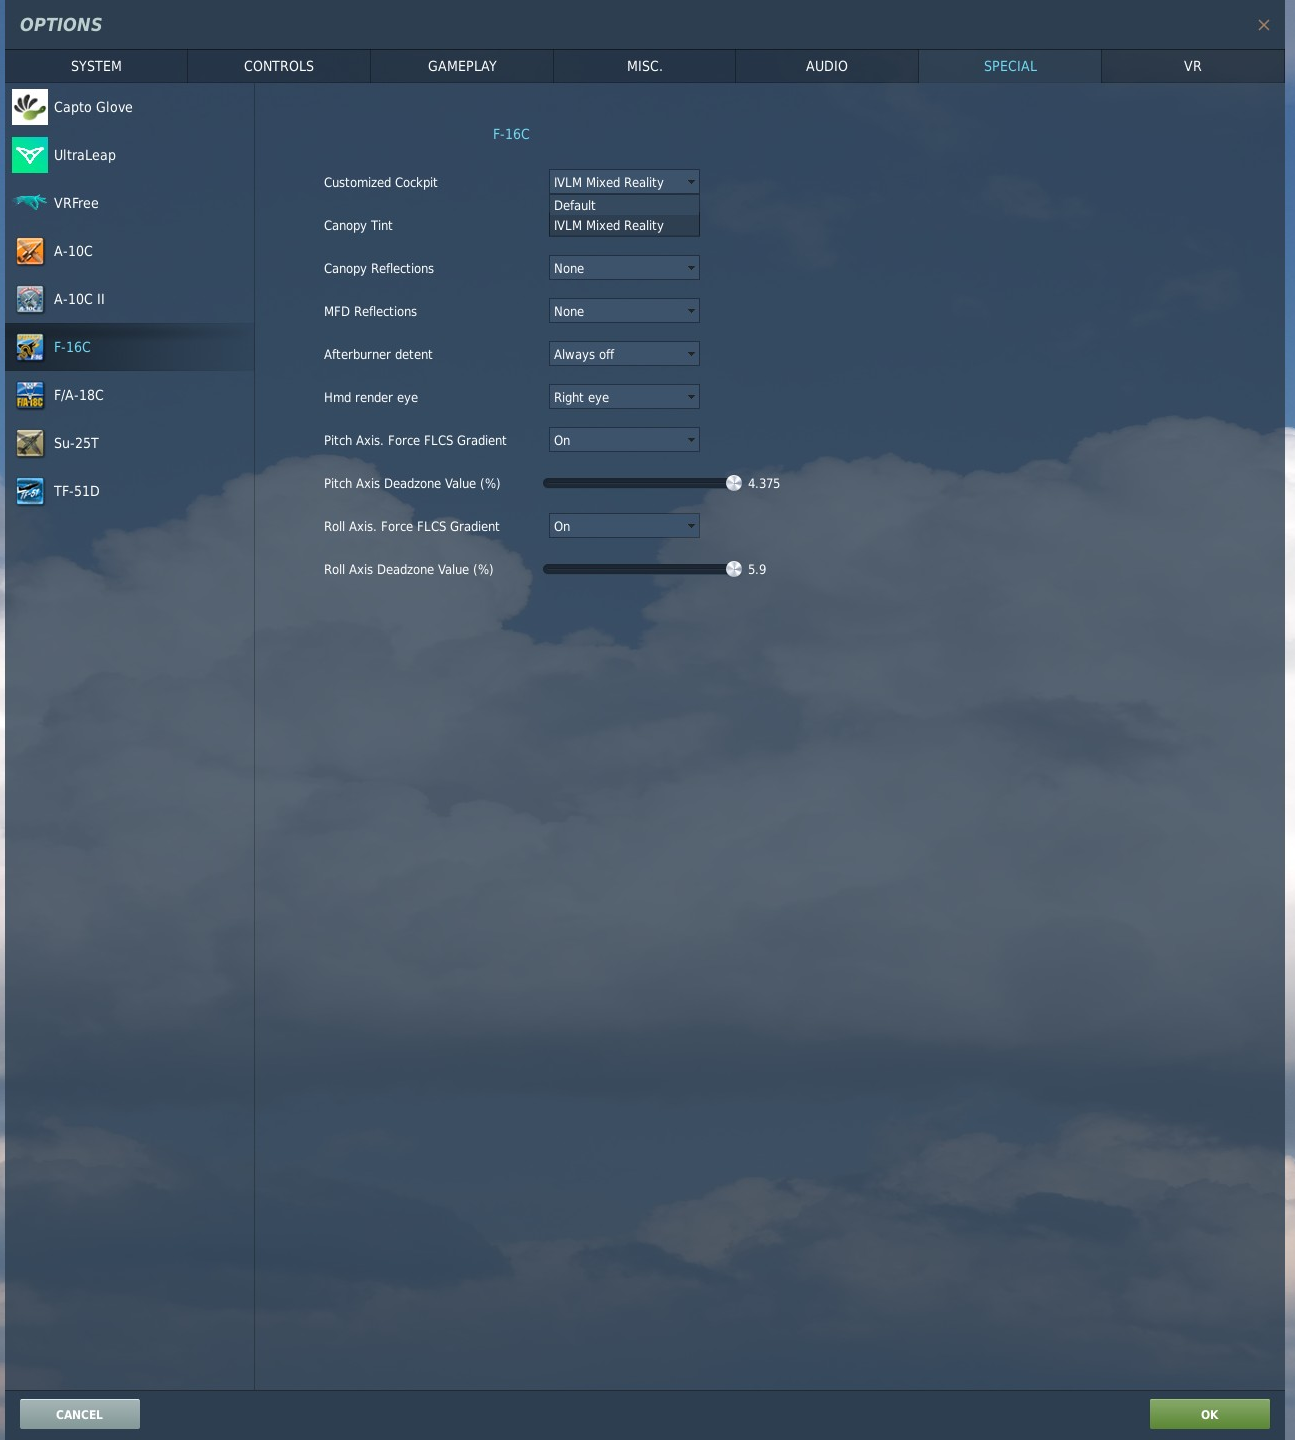
The livery installs under its own name, so your stock cockpit is untouched. Switch between the passthrough cockpit and the normal one any time in DCS under Options → Special → F-16C → Customized Cockpit (or the matching F/A-18C entry for the Hornet). After installing or switching, always close DCS completely and restart it; DCS only scans for liveries at startup.
Remove uninstalls both the livery and the helper mod cleanly.
About that dropdown
The Viper's cockpit-livery dropdown has been broken in DCS itself for years: the cockpit reads the selection from a different place than the options screen writes it. The manager works around this automatically when it applies your settings, which is also why the dropdown starts working once the manager has set things up.
Recommended VR settings
The chroma key works best with specific renderer settings. Reflections paint moving highlights over the key color, shadows darken it, and lens effects bloom across it; any of these can punch holes in the passthrough. The page audits every recommended setting and shows what differs.
Click Apply all with DCS fully closed. The manager patches the settings file directly and keeps a backup alongside it; Restore backup puts your old settings back. DCS must be closed because it rewrites its settings file on exit and would overwrite the changes.
The applied settings are: canopy and MFD reflections off (both the aircraft's special options and the global graphics toggle), shadows flat/off, SSAO off, SSLR off, cockpit global illumination off, lens effects off, motion blur off, VR bloom off, and the VR mirror set to the DCS system resolution. Everything else, including your resolution, is left alone.
Lighting Engine
Lighting Engine handles four things no livery can reach:
-
Key stability in flight. DCS's cockpit lighting used to shade the chroma color with sun, shadow, and reflections, so surfaces "popped" pink as the aircraft maneuvered. It adds a shader bypass that outputs the key as a constant before lighting touches it (community fix by beta tester Ron D), and a final-pass snap that pins every key-hued pixel to the exact key color, so texture filtering, anti-aliasing, exposure, and lit indicator overlays can't push the key out of the chroma window either.
-
Magenta light bleed. The keyed cockpit acts as a bright light source, and DCS's cockpit ambient lighting washes that color onto the virtual parts (canopy frame, HUD arms). It tames the cockpit's image-based lighting so the bleed disappears.
- Night flying. At night, DCS's lighting leaves the cockpit too dark for the chroma key to work. With the Lighting Engine applied, turn the instrument lighting knobs up after dark and the cockpit keys correctly. Day flying with the knobs off is unchanged.
- Display exports. The in-cockpit display overlays are turned off so they can't float over your physical screens; see Display exports below.
This is the one feature that modifies files in the DCS installation (the aircraft's cockpit model, its lighting parameters, the cockpit shaders, and its display scripts), so applying it shows a Windows administrator prompt. The manager keeps pristine backups of the model, lighting, and shader files, and Restore original puts them back at any time. The display scripts are edited in place: only the Lighting Engine's own marked lines are added or removed, so viewport lines from other tools are never touched.
One-time slow DCS start
Applying or restoring the Lighting Engine clears DCS's compiled-shader caches, and the next DCS launch rebuilds them: DCS can sit at a frozen-looking screen for 10 to 30 minutes. This is normal, happens once, and must not be interrupted; do not end the DCS process. Every launch after that is normal speed. Applying again for a livery or display update skips the rebuild; only a shader change, such as switching the key color, triggers it.
Two things to know:
- DCS updates and repairs quietly undo it. Nothing breaks; the pill reads "Partially applied" and the cockpit behaves stock again until you click Apply on this page.
- Strict multiplayer servers with pure-client integrity checks will flag the modified files. Use Restore original before flying on those servers, and apply again afterward.
Display exports
With the passthrough livery, the keyed display screens show your real pit, but DCS would still draw the display symbology in the virtual cockpit, so MFD pages, DED lines, and RWR contacts would float over your physical screens. The Lighting Engine turns those in-cockpit overlays off and nothing else. Any export viewport a display already has, assigned by your DCS monitor setup, Helios, AIM Cockpit Manager, a community export mod, or a hand edit, under any name, is kept exactly as it is, and the display renders only there. A display with no viewport at all is rendered to a single pixel off screen, because DCS only updates a display it renders: hardware that reads the displays through DCS-BIOS keeps receiving live values, and nothing shows in the cockpit.
If another tool patches the display scripts after the Lighting Engine (a Helios or AIM update, for example), the pill reads "Partially applied" and the overlay may return until you click Apply, which puts the Lighting Engine's lines back on top. Nothing that tool added is lost.
The viewport names to use in your monitor setup are LEFT_MFCD,
RIGHT_MFCD, EHSI, DED, RWR, CMDS, and UHF_RADIO for the
F-16C. The MFD and EHSI names are the ones DCS already uses; the DED,
RWR, CMDS, and UHF hooks are added by the Lighting Engine, since DCS
doesn't ship export support for those displays. For the F/A-18C Hornet
the names are LEFT_MFCD, RIGHT_MFCD, CENTER_MFCD, RWR, UFC,
and IFEI; the first three are the names DCS already uses, and the
RWR, UFC, and IFEI hooks are added by the Lighting Engine.
VR users with export screens need two DCS-side settings. In the DCS
VR options, set the mirror to use the DCS system resolution; with the
default headset-sized mirror the DCS window shrinks to the mirror pane
while the headset is active, and any export viewport outside it, which
is where a physical MFD monitor usually sits, goes dark even though the
same layout works in 2D. The settings audit on this page flags it. Your
monitor setup file also needs the line VR_allow_MFD_out_of_HMD = true
at the top level; AIM Cockpit Manager writes it for you.
Changing your monitor setup takes effect on the next DCS start; the Lighting Engine itself doesn't need re-applying for it. Helios users: apply Helios's DCS patches first, then the Lighting Engine, so its display hooks sit on top of Helios's.
Choosing the key color
The Chromakey settings section of the VR Passthrough page offers two chroma key colors, magenta and blue, with a sample square of each. The choice applies to every aircraft. Switching recolors the installed cockpit livery on the spot, and the Lighting Engine generates its shaders for the same color, so it reads "Partially applied" until you click Apply again (that is one shader rebuild). Magenta is the proven default. Blue is less noticeable after Virtual Desktop's video compression: any fringe the encoder leaves at the passthrough edge is dark blue rather than bright pink.
Virtual Desktop setup
On the headset, use Virtual Desktop with the VDXR runtime and HEVC 10-bit at the highest bitrate your setup sustains. In the passthrough settings, enable chroma keying with the values for the key color you chose. The app shows the same values under the selected key, and again in a popup after the Lighting Engine is applied.
| Setting | Magenta | Blue |
|---|---|---|
| Key color (red, green, blue) | 153, 0, 153 | 0, 0, 180 |
| Similarity | about 17 percent | about 10 percent |
| Smoothness | about 12 percent | about 10 percent |
| Opacity | 100 percent | 100 percent |
Both sets assume the Lighting Engine is applied, since its shaders pin the exact key color DCS outputs. The two keys are separate setups; do not carry either key's Similarity and Smoothness over to the other. Tune Similarity and Smoothness a point or two to your lighting.
Turn off Virtual Desktop's video sharpening; it amplifies color fringing at the passthrough edges. For night flying, apply the Lighting Engine and raise Similarity a few points if dim corners of the pit stop keying.
Aligning the virtual and physical cockpit
The passthrough boundary follows DCS's cockpit geometry, so the virtual cockpit needs to sit exactly where your physical one does: same position, same size. Both adjustments live in DCS; Virtual Desktop has nothing to align because the camera feed is locked to the real world by the headset's own tracking.
Match the size first. In DCS's VR settings tab, enable the forced IPD distance and treat it as a world-scale dial: a smaller value makes the virtual cockpit larger, a larger value makes it smaller. Your glareshield is the ideal ruler; adjust until the virtual glareshield width matches the physical one. This scales the whole world uniformly, and at the small corrections a cockpit match needs, the effect outside the canopy is barely noticeable.
Then set the position. Sit in your normal flying posture and recenter VR (Num 5 by default). Nudge the cockpit camera until virtual landmarks line up with their physical counterparts: the cockpit camera move controls are bound under the View Cockpit category (RCtrl+RShift plus the numpad keys by default), and RCtrl+RShift+Num 5 resets the camera if you get lost. When the glareshield edges and canopy rails line up, press RAlt+Num 0 (Save Cockpit Angles) to store it as the aircraft's default view. From then on, every VR recenter snaps the virtual pit back into alignment with the real one.
Two supporting details: set your headset's floor height honestly, since it anchors the vertical origin DCS receives, and expect to iterate the size and position steps once or twice, since scaling shifts the landmarks you aligned to.
Cockpit profiles
The profile selector at the top of the page chooses which aircraft everything on the page operates on. Profiles that ship with the manager (the F-16C and F/A-18C today) carry everything built in: the right folders, the right settings, the loader workaround, and the Lighting Engine.
Add profile... wires in an aircraft the manager doesn't ship a profile
for yet. You'll need the cockpit unit folder name (the folder DCS uses
under Liveries, for example Cockpit_F-18C; the folder button lets you
pick it from your game installation instead of typing it) and the options
section name the aircraft uses in DCS's settings file. The loader section
and release tag are optional and only needed for special cases. Custom
profiles install liveries from local zip files, and Remove deletes
them again; built-in profiles can't be removed.
Updates
Invictus cockpit liveries carry a version stamp. The page compares your installed version against the latest release and shows both under the install button; when a newer livery is available the button changes to Update to v.... Livery updates are independent of app updates, so improvements ship as soon as they're ready.
Troubleshooting
- The cockpit isn't keyed in DCS. Restart DCS completely; liveries only load at startup. Then check all three status pills on the page are green and that Options → Special → (your aircraft) → Customized Cockpit shows the passthrough livery.
- Glare or reflections punch holes in the passthrough. Run Apply all under Recommended VR settings with DCS closed. If you changed graphics settings recently, re-run it; DCS sometimes reintroduces reflections.
- The cockpit is green or dark at night, or virtual parts have a pink tint. Apply the Lighting Engine, then turn the instrument lighting knobs up at night. If either symptom returns after a DCS update, apply it again.
- Display symbology floats over your physical screens. The Lighting Engine isn't fully applied; its pill reads "Partially applied" after a DCS update restores the stock display scripts, or after another tool patches them. Click Apply.
- A display went dark on your physical screen. Its viewport isn't assigned. Check the viewport name in your active monitor setup file, and that your display tool's patch is still present in the DCS scripts; the Lighting Engine keeps whatever it finds there.
- A button does nothing, or its spinner never stops. The app writes
a log at
%APPDATA%\Invictus Cockpit Systems\Invictus Livery
  Manager\ivlm.log
; attach it when you report the problem. - A multiplayer server rejects you. Use Restore original under Lighting Engine, fly, then apply it again afterward.
- A thin pink fringe at the passthrough boundary comes from the headset video stream's color compression, not from DCS: video codecs store color at reduced resolution, smearing the key slightly across edges. HEVC 10-bit (or AV1 10-bit), the highest bitrate your link sustains, and the VDXR runtime keep it minimal, and the blue key makes whatever remains far less visible than magenta's pink.